Rowhammer Lab
Due Date: Apr 11; Last Updated Date: Mar 26
Table of Contents
- Introduction
- Part 0: Lab Infrastructure
- Part 1: Bridging the Virtual and Physical Address Spaces (10%)
- Part 2: Observing Bitflips in the Wild (40%)
- Part 3: DRAM Geometry (20%)
- Part 4: Mitigation using Error Correcting Codes (30%)
- Behind the Scene: How this lab infrastructure was developed?
Collaboration Policy
Our full Academic Honesty policy can be found on the Course Information page of our website. As a reminder, all 6.5950/6.5951 labs should be completed individually. You may discuss the lab at a high level with a classmate, but you may not work on code together or share any of your code.
Getting Started
You will complete this lab primarily in C and C++. Refer to the recitation materials if needed.
We are using git for all the labs – instructions for setting up the git repository can be found on the labs page.
In addition to submitting code, you are required to submit a PDF lab report containing your answers to Discussion Questions to gradescope. We provide a markdown template in the starter code (report.md).
Introduction
In this lab, you will complete two tasks:
- Mount a Rowhammer attack on a real machine, taking the theory we learned in class to practice.
- Study what we can do to protect against Rowhammer.
To begin, imagine DRAM as a matrix of cells. The core of Rowhammer is to access the cells that are adjacent to each other in a specific pattern. In lecture, we studied how to design a reasonable access pattern to perform double-sided Rowhammer, and you may think the attack sounds easy to pull off. Unfortunately, it is not. The most tricky part of the attack is dealing with address translations, and figuring out how exactly we can access the bit cells needed. Note that all the addresses that a programmer (e.g., you) can manipulate are virtual addresses, which need to be translated to physical addresses, and then to DRAM cell coordinates.
Virtual Address → Physical Address → DRAM Cell Coordinate
Since each step isn’t trivial, we’ve designed the lab to guide you to build your attack step by step, handling one of the translations at a time. At the end of this lab, you will not only have a working Rowhammer attack, but also gain a deeper understanding of the complex addressing mechanism that is widely used in modern systems.
Part 0: Lab Infrastructure
Due to the intrinsic physical requirements of the Rowhammer vulnerability, your experiments will be run on our special lab machines. These machines have been verified to reliably be vulnerable to Rowhammer, and your lab answers will be specific to these machines’ configuration.
The experiments also require to exclusively use the whole DRAM. To achieve this, we will use HTCondor to time-shared the lab machines, running one experiment at a time. You will ssh to arch-sec-1.csail.mit.edu (with a jump server as previous labs), develop and build your code on it, and use HTCondor on it to remotely launch your code on one of the vulnerable machines (csg-exp{6,7,9,10} and arch-sec-{5-8}). Note that you will not be directly accessing these vulnerable machines, since this may interfere with another student’s experiments.
Configuration
Your assigned machine information has been emailed to you. Before moving past this point, edit
launch.condorand update theRequirementsline to match the specific machine assigned to you. Make sure you exclude the.csail.mit.edusuffix when filling it.
Use HTCondor
You will use HTCondor to launch your attack code, using the following commands to interact with HTCondor:
./launch.sh [BINARY FILE]: run the specified binary filebin/[BINARY FILE]on your assigned remote machine. The output will be placed inlog/[BINARY FILE].out, and any errors generated by your code will be placed inlog/[BINARY FILE].error.cat log/[BINARY FILE].out: Check the output of your job by opening the corresponding output file.cat log/[BINARY FILE].error: Print all the errors experienced by your job by opening the corresponding error file.
Here is an example of using HTCondor to run a program that prints Hello World.
$ make

$ ./launch.sh part0
  Submitting job(s).
  1 job(s) submitted to cluster XX.
  All jobs done.

$ cat log/part0.out
  Hello World!
Before continuing, run the Condor commands as above, and ensure that you can interact with your assigned machine correctly. If things do not work as expected, read the next subsection for debugging tips or reach out to TAs.
Debug HTCondor
By defualt, ./launch.sh will wait for the binary finishing the execution. However, it might hang forever either because the binary itself hangs forever or becuase condor fails to schedule the binary to remote machines. In either case, you can type Ctrl+c to exit from ./launch.sh and using following commands to figure out what’s going wrong:
condor_q: Check the status of your job, including its ID and its Status. You can see more debugging information with thecondor_q -better-analyze [ID]orcat log/[BINARY FILE].log.condor_rm [ID]: Kill your job specified by the ID. Make sure you killed (or finished) all your jobs before launching new ones. Note that we config Condor to kill your jobs automatically after they have executed for 10 minutes, to allow other students to use the machine.
Here is an example that Condor cannot schedule a job becuase you forget to fill your machine name into launch.sh.
$ make

$ ./launch.sh part0
  Submitting job(s).
  1 job(s) submitted to cluster 6522.
  ^C

$ condor_q
  -- Schedd: arch-sec-1.csail.mit.edu : <128.30.65.18:9618?... @ 02/19/24 18:42:02
  OWNER     BATCH_NAME    SUBMITTED   DONE   RUN    IDLE  TOTAL JOB_IDS
  shd24-xxx ID: 6522     2/19 18:41      _      _      1      1 6522.0

$ condor_q -better-analyze 6522
  ...
  No successful match recorded.
  ...

$ condor_rm 6522
Part 1: Bridging the Virtual and Physical Address Spaces (10%)
We start with bridging the gap between the virtual and physical address spaces. Specifically, you will implement two functions: Firstly, a function that translates a virtual address to its corresponding physical address. Secondly, a function translating in the opposite direction, i.e., given a physical address, determining its corresponding virtual address.
Code Skeleton
The source code for this lab can be found in src/, and is separated into folders corresponding to different parts of the lab.
src/params.hh: Defines several key parameters, including the size of a hugepage (e.g. 2MB), the size of a DRAM row, etc.src/verif.hh: Contains declarations for functions which will help you check your solutions, and will be used for grading. The implementation of these functions are inbin/verif.o.src/shared.hhandsrc/shared.cc: Contain functions which are shared across different parts of the lab. You will complete these functions in Part 1.
You can compile the code by running the command make at the root of the repository, which will create five executable files (part[0-4]) in the bin/ folder. Note that you will need to re-run make each time you change your code to re-compile it. For example, observe the initial behavior of the initial codebase:
$ make

$ ./launch.sh part1
  Submitting job(s).
  1 job(s) submitted to cluster XX.
  All jobs done.

$ cat log/part1.out
  virt_to_phys test failed!
Before continuing, run
makeand make sure your codebase compiles successfully and returns the same output as above.
Linux’s pagemap interface
The machines in this lab used paged virtual memory (if you need a refresher on this topic, check out 6.191’s (6.004’s) lectures on Virtual Memory 1 and Virtual Memory 2).
Linux provides the pagemap interface that allows userspace programs to examine page tables and related information. For a running process, its pagemap can be accessed by reading the file /proc/self/pagemap. This pagemap file is binary-encoded, containing a sequence of 64-bit values. Each 64-bit value corresponds to a virtual page (assuming a page size of 4KB), where the N-th 64-bit value corresponds to the N-th virtual page. The figure below indicates the semantics for each page entry.

Example Page Map Entry
Bit 63 indicates whether the page presents in memory or not. If the page is present in memory, Bits 0-54 of the entry is the physical page number (PPN). The remaining (metadata) bits have their own meaning, which are not relevant for this lab. If you’re curious, more information can be found in the corresponding Linux kernel documentation page.
Note
As a countermeasure of Rowhammer,
/proc/self/pagemapis not allowed to be accessed by non-sudo user since Linux 4.0 (released in 2015). However, we definitely do not want to give you sudo permission on our lab machine! Thankfully (for us), our TA, William Liu, developed a workaround through a kernel module, detailed in the section at the end of this handout.
Translating Virtual to Physical Addresses
We can leverage the pagemap interface to perform the virtual address to physical address translation. In the virt_to_phys function in shared.cc, you will translate a given virtual address to its corresponding physical address. You will implement this function assuming the page size is 4KB. At a high-level, your virt_to_phys function will do the following:
- Given a virtual address, derive the address’ virtual page number (VPN).
- (provided) Read
pagemapto find the corresponding page table entry. - (provided) Extract the physical page number (PPN) from the page table entry.
- Compute the physical address from the physical page number (PPN).
1-1 Exercise
Complete the
virt_to_physfunction insrc/shared.ccassuming 4KB page size. Test your code by running./launch.sh part1. You should seevirt_to_phys test passed!
When you bit-shift the 55-bit PPN, you may notice that the upper bits cannot fit in a 64-bit address. You can ignore this effect, since the upper three bits of the PPN field are unused on our system.
Translating in the Other Direction
You will find it handy if you can perform address translation in the opposite direction, from physical to virtual addresses. The idea is to construct a reverse page table, i.e., a map that records the mapping relationship from physical page numbers (PPN) to virtual page numbers (VPN). In shared.cc, PPN_VPN_map serves as the reverse page table. It is a dictionary implemented using C++’s std::map syntax, with physical page numbers as keys and virtual page numbers as values. For more information related to C++ and examples of how to use the std::map object, refer to the recitation materials.
Your task is to complete the function setup_PPN_VPN_map (in shared.cc) to populate the PPN_VPN_map data structure. You can assume the page size is 2MB as opposed to 4KB. The populated reverse page table should cover a 2GB region following the pointer mem_map.
1-2 Discussion Question
In a 64-bit system using 4KB pages, which bits are used to represent the page offset, and which are used to represent the page number?
How about for a 64-bit system using 2MB pages? Which bits are used for page number and which are for page offset?
In a 2GB buffer, how many 2MB hugepages are there?
Demystifying 2MB vs. 4KB Page Sizes
You are asked to use 4KB page to probe the
pagemapinterface, but 2MB page to build the reverse page table. You may wonder – why do we use inconsistent page sizes and will it not introduce bugs?In our setup, we ask the OS to give us the 2GB region using hugepages (2MB page size) inside the
allocate_pagesfunction. We use hugepages to simplify the address translation step (using 2MB pages allows us to more easily determine the DRAM bank of an address later on in this lab). Thepagemapinterface is designed, however, to assume 4KB pages, with each 64-bit entry corresponding to one 4KB page.As we know that for address translation, we take the VPN and translate it to PPN, but keep the page offset unchanged. So a virtual address and its corresponding physical address always have the same page offset. When considering 2MB and 4KB pages, we can consider a 2MB page to consist of 512 4KB pages. For these 4KB pages, the lower 9 bits of their VPNs are counted as page offset for a 2MB page. Therefore, when being translated between virtual and physical address, these 9 bits do not need to be changed.
One quirk with C++ maps is that C++ will return 0 (i.e.,
NULL) instead of throwing an error if you try to retrieve a value which isn’t in the map. You will only encounter addresses with non-zero virtual page numbers in this lab, so you may want to check for lookups which return zero!
1-3 Exercise
Complete the
setup_PPN_VPN_mapfunction insrc/shared.ccto populate the reverse page table. Test your code by running./launch.sh part1. You should seePPN_VPN test passed!
1-4 Exercise
Complete the
phys_to_virtfunction insrc/shared.cc: given a physical address, determine its corresponding virtual address. You will need to use the reverse page tablePPN_VPN_mapthat you have constructed. Test your code by running./launch.sh part1. You should seephys_to_virt test passed!
Submission and Grading
Relevant files to submit to GitHub: src/shared.cc
Part 2: Observing Bitflips in the Wild (40%)
Good news, you will get a working Rowhammer on a real machine by the end of Part 2 (potentially earlier than you might have expected!). As we mentioned before, to make Rowhammer work, we need to manipulate addresses to go through two translation steps: Virtual Address → Physical Address → DRAM Coordinates. To save your effort in reverse engineering the second translation step, we have pre-profiled the lab machines and located victim and attacker rows, and we directly provide the physical addresses of the startings of these rows to you (see table below, as well as file src/part2/part2.hh). With these information, you can use your reverse page table PPN_VPN_map to find the corresponding virtual addresses. Your task in this part is to implement a double-sided Rowhammer attack and try the attack on these addresses.
| Victim | Row Above (A) | Row Below (B) | Distant Row (C) | Same Row ID, Diff. Bank (D) |
|---|---|---|---|---|
| 0x75380000 | 0x753A2000 | 0x7536E000 | 0x75308000 | 0x75382000 |
Attack Outline
You will implement the Rowhammer attack strategy inside the hammer_addresses function (in src/part2/part2.cc). The main function (in part2.cc) contains code to call your hammer_addresses function to perform the attack, collect statistics and report the number of observed bitflips. You should not modify the main function.
Getting Rowhammer to work can be quite tricky. When writing your code in C/C++, you have to think very carefully about what DRAM operations will be triggered by the code and what cells are being accessed with your code. For our specific DRAM configuration, a row is of size 2^13 = 8KB and its physical address is aligned at 8KB.
Here is a high-level description of the attack you will implement.
- Prime the victim and attacker rows. Set the victim row to all 0’s, and set the attacker rows to all 1’s.
- Theoretically, Rowhammer works when we access neighboring rows with a specific pattern and should work regardless of the content inside the attacker and victim rows. However, according to prior work, setting the attacker’s rows to all 1’s and victim’s row to all 0’s can result in a higher probability of triggering bitflips.
- When priming rows, ensure that you’re writing the values to the entire row, and not priming outside of row boundaries. If you’re observing bit-flips in your victim row 100% of the time, it is likely that you accidentally wrote 1’s to the victim row when you meant to prime the attacker row.
- Hammer two rows, repeatedly alternatively accessing two attack rows in DRAM 5 million times.
- To access a row, you only need to access one address belonging to that row. Think about how the row buffer works.
- Once you access a row, it will be fetched in the cache and later accesses will hit the cache. Thus, you will need to come up with a way to ensure that accesses to these two rows always reach DRAM.
- Probe the victim row, compare the read results with the primed values (aka, all 0’s), and check whether any bit in the row has been flipped to a 1.
- It can be tricky to determine whether a bitflip is observed due to an implementation bug or the actual Rowhammer effect. You should test your code to make sure that without the hammering step (e.g., only priming), the probe observes no bitflips.
Tips for Programming in C/C++
- Be cautious when you try to set every bit in a row to 1. You need to pay extra attention to the size of the variable. For example,
uint8_t x = 1meansx=8'b00000001, consisting of seven 0s and only one 1s.- When you are writing your code, you may need to convert between integers (
uint64_t) and pointers (uint8_t *) and vice-versa. You may find C++’sreinterpret_castuseful in performing these conversions:uint64_t addr = 0xDEADBEEF; // A 64bit integer // Cast the 64bit integer to a pointer volatile uint8_t * addr_ptr = reinterpret_cast<volatile uint8_t *>(addr); uint8_t tmp = *addr_ptr; // Read using the casted pointer- Throughout your code, we suggest always using
uint64_trather thanint, sinceints can result in silent overflows when shifted by large values.- Be mindful that the order of operations in C++ may not be what you expect. For instance,
a << 12 - 1is different from(a << 12) - 1. If in doubt, use parenthesis.
2-1 Exercise
Complete the
hammer_addressesfunction insrc/part2/part2.cc.The
mainfunction inpart2.ccwill usehammer_addressesto hammer 3 attacker row pairs (i.e., A/B, A/C, and A/D, the address of A, B, C, and D are showned in the table above) 100x, and report how often the attack succeeds (i.e. observes at least one bit flip in the victim row).
2-2 Discussion Question
Include the bitflip observation statistics in the table below. Then answer the following questions:
Do your results match your expectations? Why might some attacker pairings result in more flips than others? Do you expect any of the pairs to never cause a flip?
Hammering Pairs A/B A/C A/D Number of Successes (100 trials)
Submission and Grading
Relevant files to submit to GitHub: src/part2/part2.cc.
Part 3: DRAM Geometry (20%)
Congratulations for making Rowhammer work. However, we slightly cheated in Part 2 since a real hacker does not have access to the information that you had, i.e., the physical addresses of the victim rows and attacker rows. Instead, they need to locate attacker rows via reverse engineering the physical address to DRAM coordinate mapping. You may have noticed from above that adjacent rows might not be a constant stride apart in the physical memory space. For instance, the difference between the victim row and the row above it (A) is 0x22000, while the difference between the victim row and the row below it (B) is 0x12000. So what is happening here?
This added complexity is introduced due to the geometry of the DRAM. Consider a DRAM coordinate of a bit cell is a tuple of <DIMM id, Channel id, Rank id, Bank id, Row id, Column id> (see details in the lecture slides). Recall that for two rows to be physically adjacent to one another in a DRAM chip, they must have the same <DIMM id, Channel id, Rank id, Bank id>, and their <Row id> should differ by 1. In most DRAMs, each of the <DIMM id, Channel id, Rank id, Bank id> is derived by XORing a selection of bits from the physical address. These XOR functions, i.e., which bits are used to perform the XOR operation, are proprietary information and are not typically provided by CPU vendors.
In our lab machines, the <DIMM id, Channel id, Rank id> are determined by higher bits and the addresses in a 4GB region share the same of these ids. Our lab machines have 16 banks, making the <Bank id> a 4-bit value. Each bit in these 4 bits is computed by XORing some of the bits 13-16 with some of the bits 17-20. The bits involved in the derivation of the <Row id> and <Bank id> are listed below and also visualized in the figure.
- <Row id>: bits 17-31
- <Column id>: bits 0-12
- <Bank id>: (unknown) each bit comes from XORing some of bits 13-16 (the exact number of bits being XORed can range from 0 to 4) with some of bits 17-20
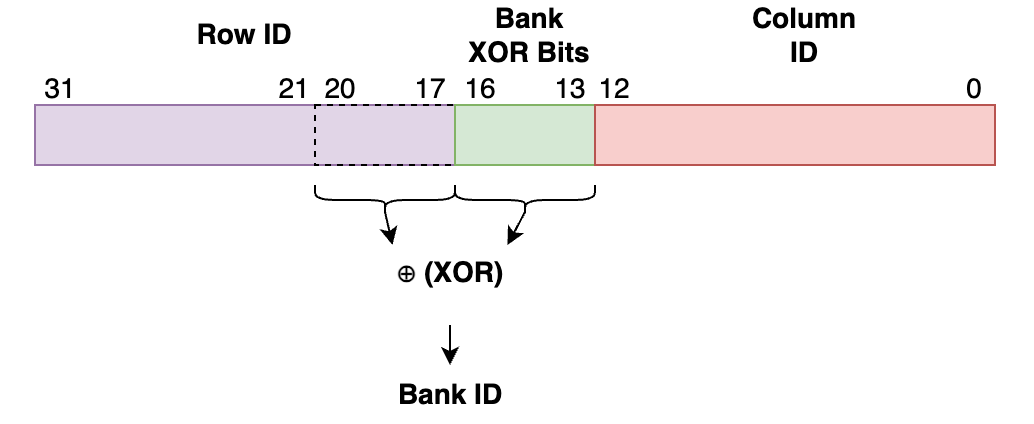
Physical address bits involved in Row/Bank ID generation
3-1 Discussion Question
Given a victim address
0x752C3000, what is the value of its <Row id>? The value of its <Column id>?For this same victim address, when the exact XOR function being used for computing the <Bank id> is unknown, list all possible attacker addresses that stays in the row below the victim address (i.e., the attacker’s <Row id> is 1 more than the victim’s) while sharing the same <Column id> and <Bank id>. Hint: there should be 16 such addresses total.
Bank-conflict Side Channel
How can we determine whether two addresses map to the same bank or not without knowing the proprietary XOR function? The answer is to use our favorite tool in 6.5950: timing side channels!
As discussed in the lecture, a DRAM bank can only serve one memory request at a time, but multiple accesses to different banks can be served simultaneously, allowing for bank-level parallelism. So, if you issue two memory requests to the same bank back-to-back, one of the requests needs to wait for the other to complete before being served, resulting in longer latency. In contrast, if the two memory requests target two different banks, they can be served in parallel, resulting in a shorter latency. As such, we can use the timing of these accesses to determine whether or not they reside in the same bank.
3-2 Discussion Question
Write a short code snippet (psuedocode) to implement a program that takes two addresses
addr_Aandaddr_Bas input and outputs a boolean value to indicate whether they map to the same bank or not. The style of your psuedocode can either be C-style, or can follow the single-sided Rowhammer assembly code example from the lecture slides:loop: mov (A), %eax mov (A_dummy), %ecx clflush (A) clflush (A_dummy) mfence jmp loop
The XOR function can also be reverse-engineered via other types of timing side channels. If curious, you can read DRAMA to see how this can be done.
The XOR Function
It is a bonus if you can implement the bank-conflict side channel and reverse engineer the XOR function. For now, we just give you the XOR function and ask you to answer a discussion question based on it.

Bank ID XOR Formula for our lab Machines
3-3 Discussion Question
Based on the XOR function described above, determine which of the 16 candidate addresses you derived in Discussion Question 3-1 maps to the same bank.
Bonus: Implementing the Bank-conflict Side Channel (5%)
3-4 Exercise (Bonus)
In
src/part3/part3.ccimplementmeasure_bank_latency, which measures a (potential) bank collision between two addresses. The staff-providedmainfunction inpart3.ccwill call yourmeasure_bank_latencywith two different address pairs. The first address pair will map to the same bank, and the second address pair will map to different banks.
3-5 Discussion Question (Bonus)
Report the statistics produced by your code when running
part3, and describe how you can use the difference in these statistics to distinguish between the pairs.
Submission and Grading
Submitting src/part3/part3.cc is only required if you complete the bonus component.
Part 4: Mitigation using Error Correcting Codes (30%)
Now that we’ve learned how to cause bit-flips in the wild, let’s now explore a potential defense to Rowhammer: Error Correcting Codes (ECC). Error correcting codes, as the name suggested, can help correct errors. More precisely, they are encoding schemes that add redundancy to stored data and use the redundancy to detect and correct errors when they occur. There exist variety of ECCs with different capabilities and storage overhead.
For this part, you do not need to use condor. You can run your code on the CSG server or simply on your own machine by directly running ./bin/part4.
Understanding ECC: Types and Design Choices
We study the three most commonly seen ECCs.
- Repetition Codes: The simplest code is the repetition code, which duplicates each bit in the data multiple times.
- Examples: a 2-repetition code protecting the value
1011is stored as1011 1011, and a 3-repetition code would be stored as1011 1011 1011. - Error detection: straightforward.
- Examples: a 2-repetition code protecting the value
- Single Parity Bit: If we’re concerned about storage overhead, we can detect errors by calculating the parity of the data by XORing the data bits together.
- Examples: the parity bit for
1011is1, and the parity bit for1001is0. - Error detection: A single bit flip in the data results in the parity bit changing. To detect bit flips, we can re-calculate the corrupted data’s parity and compare it against the previously calculated parity bit stored with the data. If more than one bit flips, this scheme may or may not detect it.
- Examples: the parity bit for
- Hamming Codes: Hamming codes use multiple parity bits to deal with bit errors. Given a scheme protecting N bits with K parity bits, we call it Hamming(N+K, N).
- Examples: The most common Hamming code is Hamming(7,4), i.e., 4 data bits protected by 3 parity bits. A graphical depiction of the parity encoding (p1 to p3) for the 4 data bits (d1 to d4) is shown below. As indicated by the green circle, the first parity bit p1 considers the parity of data bits 1, 2, and 4, and is calculated by XORing d1,2,4 together. Similarly, the purple circle indicates that the second parity bit p2 is calculated by XORing d1,3,4. You can infer how the last parity bit p2 is calculated from the red circle.
- Error detection: Within each circle, we can perform the same parity check as in the “Single Parity Bit” scheme. By using parity bits in such an overlapping fashion, the Hamming(7,4) code can detect one or two bit flips (even though it cannot tell exactly how many bits flip). By assuming only one bit flips, it can further correct it.

Hamming(7,4) Code Example (Source)
#/media/File:Hamming(7,4).svg)
4-1 Discussion Question
Given the ECC type descriptions listed above, fill in the following table (assuming a data length of 4). For detection/correction, answer “X” only if it can always detect/correct X number of erorrs, with no corner case exceptions. For detecting more than 1 error, the scheme is not required to tell exactly how many errors exist. We’ve filled in the first column for you.
1-Repetition (No ECC) 2-Repetition 3-Repetition Single Parity Bit Hamming(7,4) Code Rate (Data Bits / Total Bits) 1.0 Max Number of Errors Can Detect 1 Max Number of Errors Can Correct 0
Implementing ECC: Hamming(22,16)
Let’s try to implement a Hamming coded ECC that is used in real hardware for protecting DRAMs. These ECCs are introduced primarily to defend against soft errors. Hamming(22,16) can correct single errors and detect double errors (SECDED). It uses six parity bits (P0-P5) to protect sixteen data bits (D0-D15). The equations for the first five parity bits (P0-P4) are shown below (and also described on Page 2 of this hardware documentation).
P0 = D15 ⊕ D13 ⊕ D11 ⊕ D10 ⊕ D8 ⊕ D6 ⊕ D4 ⊕ D3 ⊕ D1 ⊕ D0
P1 = D13 ⊕ D12 ⊕ D10 ⊕ D9 ⊕ D6 ⊕ D5 ⊕ D3 ⊕ D2 ⊕ D0
P2 = D15 ⊕ D14 ⊕ D10 ⊕ D9 ⊕ D8 ⊕ D7 ⊕ D3 ⊕ D2 ⊕ D1
P3 = D10 ⊕ D9 ⊕ D8 ⊕ D7 ⊕ D6 ⊕ D5 ⊕ D4
P4 = D15 ⊕ D14 ⊕ D13 ⊕ D12 ⊕ D11
The last parity bit, P5, protects both the data and the other parity bits, and is computed by XOR-ing all of the data bits (D0-D15) and the other parity bits (P0-P4). We refer to P5 as the overall parity bit.
To start, implement the parity encoding operation in src/part4/part4.cc.
For your convenience, we’ve provided the following helper types/functions in src/part4/part4.hh:
struct hamming_struct: A C++ struct which contains a data and parity pair. The bit 0 (i.e., lowest bit) of data is D0, the bit 1 of data is D1, … The bit 0 of parity is P0, the bit 1 of parity is P1, …struct hamming_result: Stores an error type (one ofNO_ERROR/SINGLE_ERROR/DOUBLE_ERROR/PARITY_ERROR) and computed syndrome (explained later).getBit(data, pos): Returns the value of the bit at positionposwithindata.flipBit(data, pos): Flips the bit at positionposwithindata.isParityBit(bitNum): Returns whether bitNum corresponds to a parity bit in the Hamming(22,16) encoding.extractEncoding(encoded): Takes a 22-bit encoded ECC value, and extracts the parity and data bits (returned in ahamming_struct).embedEncoding(hamming_struct): Takes in ahamming_structand returns the combined ECC value.parity_eqsarray inpart4.cc: Describes the parity equations in an array representation.
4-2 Exercise
Complete
genParity()to calculate the parity bits (P0-P5) for an input piece of data that needs protection. You should see a message telling you that your parity value is correct when you run./bin/part4(make sure to compile your implementation usingmake!).
Now, let’s consider how error detection and error correction are performed in Hamming(22,16). Given a single-bit error, Hamming(22,16) can detect whether the error has happened and locate the bit that has been flipped. Basically, taking a piece of 22-bit value with Hamming(22,16) protection, we can compute something called a syndrome. The encoding scheme is designed so that the syndrome corresponds to the location of the single error.
The syndrome is computed by XORing two 5-bit values. The first is the “extracted parity bits” P0-P4 stored in the 22-bit value. The second is the “reconstructed parity bits” P0-P4 from the data bits D0-D15. In addition, an overall parity bit is computed by XORing all 22 bits together. Based on the syndrome and overall parity bit, Hamming(22,16) can detect and correct bit flips in both the data bits and the parity bits. See the table below for detailed information.
| Syndrome | Overall Parity | Error Type | Notes |
| 0 | 0 | No Error | |
| !=0 | 1 | Single Error | Correctable. Syndrome holdes incorrect bit position. |
| !=0 | 0 | Double Error | Uncorrectable. |
| 0 | 1 | P5 Error | P5 is in error and can be corrected. |
4-3 Discussion Question
When a single bit flip is detected, describe what action should be conducted to correct this error with Hamming(22,16).
With all the information above, let’s complete the function findHammingErrors() which takes in an encoded ECC value and determines whether there is an error. This function should return the error type and the syndrome.
Finally, complete the function verifyAndRepair() which uses the information gained from findHammingErrors() to determine a good course of action. If there is no error, or an unrecoverable error, verifyAndRepair() should return the original value. If there is a single bit error (including parity errors), verifyAndRepair() returns the data with the error corrected.
4-4 Exercise
Complete
findHammingErrors()andverifyAndRepair(). You should seeAll tests passed!reported.
4-5 Discussion Question
Can the Hamming(22,16) code we implemented always protect us from rowhammer attacks? If not, describe how a clever attacker could work around this scheme.
Submission and Grading
Your src/part4/part4.cc will be graded automatically, checked against 5 random inputs. As always, submit your discussion questions as a PDF to gradescope.
Behind the Scene: How this lab infrastructure was developed?
As you have seen in Part 1, using the virtual to physical addresses mapping information provided by Linux’s pagemap interface is a critial step to make the rowhammer attack work. Without a surprise, this interface has been banned from non-sudo users since Linux 4.0 (released in 2015), as a quick countermeasure against rowahmmer attacks. However, throughout the lab, you are never granted sudo permission on the machine. Then how did you smoothly access this interface during the lab?
This comes from our special setups on the machines: A special kernel module is installed to bypass this permission check. The source code of it can be found in driver folder of the starter code of the lab. And we would be happy to give you a tour on how it is developed – how we navigate through the linux source code, identify the location of the permission check of pagemap interface, and hijack the checking result.
Per documentation, one requires CAP_SYS_ADMIN capabilities on Linux to access /proc/self/pagemap. We found this permission check located at Line 1624 of fs/proc/task_mmu.c file in Linux v5.15.97 source code (code here). The code does the permission check using file_ns_capable function and saves the checking result in the show_pfn field of the pm variable (whose type is struct pagemapread).
How to force this check to always return true? We could change the Linux source code and recompile it, but we do not want to – It is too muddy to config our lab machines with a Linux kernel fully compiled by ourselves. Instead, we developed the rh_driver kernel module to solve this problem, which can be installed to or uninstalled from Linux easily, while the machine is on. It uses a Linux feature known as kprobes, which allows one to “dynamically break into any kernel routine and collect debugging and performance information non-disruptively”. If we break at when the file_ns_capable function returns, we can change the return value to bypass the permission check. We use two kprobes to achieve this:
-
The first kprobe (
file_ns_capable_prefunction indriver/rh_driver.c) determines whetherfile_ns_capablefunction is called for the permission check specifically for ourpagemapinterface (i.e., is called from Line 1624 offs/proc/task_mmu.c). It checks whether the return address on the stack is within a threshold range topagemap_readfunction and whether the second and third arguments match the code from source. We think this heuristic is good enough. If this check pass, we insert the second kprobe. -
The second kprobe (
target_postfunction indriver/rh_driver.c) modifies the return offile_ns_capablefunction to betrue.
Finally, now you can access /proc/self/pagemap without any additional privileges – exciting for us as course staff, though perhaps less exciting for a student in computer security class.
Acknowledgements
Contributors: Peter Deutsch, Miguel Gomez-Garcia, Mengjia Yan, William Liu.